The goal of this article is to provide guidances on adding Cloudflare Integration to Monster Panel.
Prerequisites:
- Cloudflare ID
- Cloudflare Custom API Key
- The websites cannot already be setup in Cloudflare
Gather Cloudflare Account ID
-
Log in to the Cloudflare dashboard and select your account and domain.
-
Once you are logged in, you can view the URL and the account ID will be the string of letters and numbers in the URL.

- From there you can copy your account ID.
Gather Cloudflare Custom API Key
-
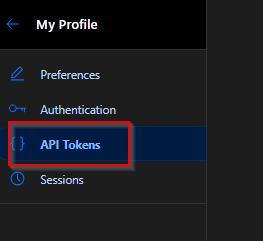
Log in to the Cloudflare dashboard and go to “My Profile”.
-
Go to API token section and click “Create Token”.
-
Now you will need to select “Get started” next to the “Custom Token” option.
-
You will then need to fill out the custom token information which should look like the example below:


NOTE: You will need to update the IP value under “Client IP address filter” to make your servers IP address.
Provide gathered info to xByte team
Once you have gathered your Cloudflare account ID and API key, you can then open a ticket and send this infromation to our support staff using a bitwarden send link. See the documentation below on how to use Bitwarden send
How to use Bitwarden send - General Information - xByte Hosting Wiki
Once the xByte team has informed you that your Cloudflare info has been added to Monster Panel, then you can proceed to the next step.
Adding Cloudflare to your account
NOTE: Monster Panel cannot integrate with site that already exists in your Cloudflare account. To allow the integration to work, you have to allow Monster Panel to add the site to your Cloudflare for you.
-
log in to Monster Panel and navigate to the “Domains” tab
-
Select the domain that you are wanting to add Cloudflare to.
-
Under “Domain Management” select “DNS Zone”
-
Use the drop-down to choose “Cloudflare-dns”, then click “Enable”.
Doing this will create the DNS zone for the selected site in your Cloudflare account.


Cloudflare DNS features
Once you have gotten Cloudflare enabled for your domain, you will have a few different options, see below:
-
Add a DNS record
-
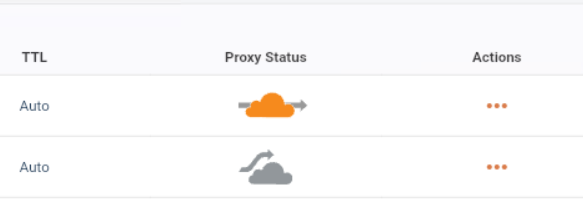
Enable and disable Cloudflare proxy
-
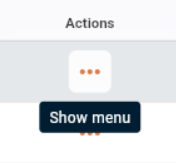
Use the action menu to Edit, Duplicate, or Delete a DNS record.
-
Find informative information at the top of the page.


NOTE: Once you have added all the records that you need and you are ready to go live with your Cloudflare DNS, you will need to copy the Nameservers that are displayed under the Nameservers drop-down at the top of the page and then update your domains nameservers at your registrar.
If you have any questions or encounter issues, please don’t hesitate to reach out to [email protected].