Windows cloud servers will have IIS6 SMTP service available by default. However, this SMTP service is outdated and has poor logging and minimal functionality. As a replacement for this service, we would recommend Smartermail Free Edition. The goal of this article is to provide steps on how to install Smartermail and configure it as the default SMTP service on your Windows server.
CONFIGURATION STEPS
-
log in to your Smartermail installation. If you have not installed Smartermail yet, then you can follow the documentation below:
How to install Smartermail on Windows - Email - xByte Hosting Wiki
-
Once you have logged into the Smartermail admin you will navigate to Settings >> Security.
-
Navigate to the Whitelist tab and click “New”.
-
You will need to add the localhost IP(127.0.0.1) and your servers public IP and you will need to make sure you check “SMTP Auth Bypass”.
NOTE: adding the SMTP bypass will allow any email sent from any websites or apps hosted locally on the server without SMTP authentication.
Since IIS6 also doesn’t require SMTP authentication, adding the SMTP Bypass in Smartermail will make it a direct replacement.
-
You will now navigate to Settings >> Bindings.
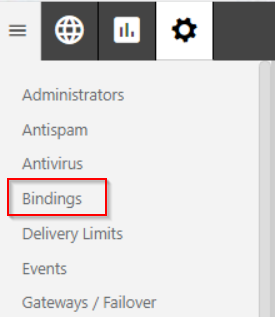
-
You will click on 127.0.0.1 and make sure that port 25 is open for this IP.
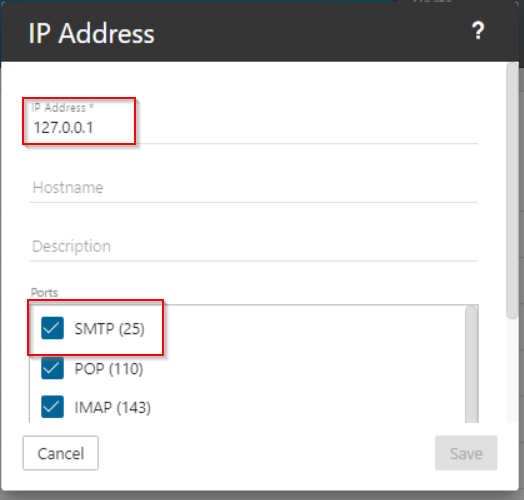
-
You will now need to go into services and stop the “Simple Mail Transfer Protocol” service.
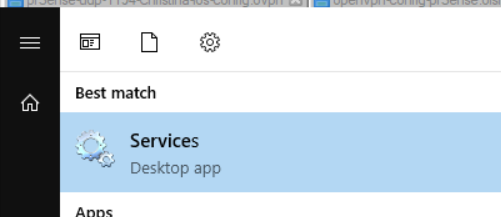
-
Once the service is stopped, you will need to right-click the service and select “properties”. From there you will switch the service to “Disabled” and then click “Apply”.
Once you have completed these steps, Smartermail should now be acting as the default SMTP service for your server.


