The Hosts file is a system file used by the operating system to map hostnames/domain names to IP addresses. This can be useful for testing your website during a site migration before updating DNS records. This article will show you how to modify your Hosts file on Windows
Prerequisites
Before starting, ensure that you have:
-
Administrator access on your Windows computer. You’ll need this to modify the hosts file.
-
The IP address that you want to map a hostname to.
-
The hostname that you want to redirect.
Step 1: Locate the Hosts File
The Hosts file is located in the following directory on your Windows computer:
C:\Windows\System32\drivers\etc
Step 2: Open the Hosts File
-
Click on the Start menu or press the Windows key.
-
Type “Notepad” in the search box.
-
Right-click on the Notepad application and select “Run as administrator”.
-
In Notepad, click on File > Open.
-
In the file name field, enter the full path of the Hosts file (as above) and click “Open”.

Step 3: Edit the Hosts File
-
Scroll to the bottom of the document. The existing entries will be preceded by a pound or hash sign (#).
-
On a new line, enter the IP address that you wish to map the hostname to, followed by at least one space or tab, and then the hostname. For example:
192.168.1.1 myhostname.com -
You can add as many entries as you like, each on a new line.

Step 4: Save and Close the Hosts File
-
Click on File > Save to save the changes.
-
Close Notepad.
Step 5: Clear Your DNS Cache
To ensure your system uses the new mappings immediately, it’s good practice to clear the DNS
cache after modifying the Hosts file.
-
Click on the Start menu or press the Windows key.
-
Type “Command Prompt” in the search box.
-
Right-click on the Command Prompt application and select “Run as administrator”.
-
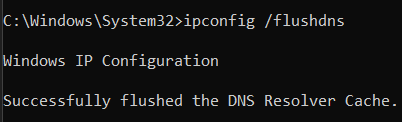
In the Command Prompt window, type the following command and press Enter:
ipconfig /flushdns -
You should see a message that says “Successfully flushed the DNS Resolver Cache”. You can now close the Command Prompt window.

That’s it! Your Hosts file has been updated and you can now test your website on a new IP before updating your DNS.
If you have questions or encounter issues, please don’t hesitate to reach out to [email protected].