How to Enable 2FA and Why
This article aims to show you how and why you should enable 2FA on your account.
Why Enable 2FA?
Two-factor authentication enhances the security of your services by requiring two forms of identification before accessing your account. This adds an extra layer of protection against unauthorized access by malicious actors.
Pre-Requisites
2FA will require you to have your own authenticator app/device. If you have an iPhone or Android mobile device, then provided below are two apps that you could utilize.
- Google Authenticator (by Google LLC)
- Duo Mobile (by Duo Security LLC)
Steps
-
To begin, you’ll need to log in to the billing control panel. Below is our Billing Control Panel URL.
Billing Control Panel: https://billing.xbytecloud.com/
-
Select “Security Settings” from within the “Account Details” drop-down on the left-hand side.
-
Select the “Click here to Enable” button.
-
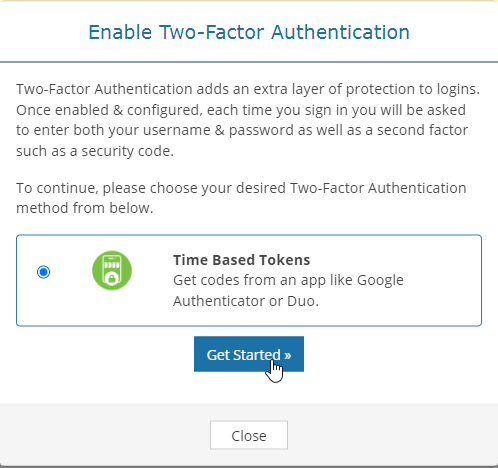
Select the “Get Started >>” button.
-
The following screen will appear with directions to add the account to your authenticator app/device. You can either input the code manually or scan the QR code using your app.
Once added, you should be able to see it within your app/device. There will be a code in there that you need to type onto this page and then click “Submit”.
-
If successful, the next screen will give you a backup code in case you lose access to your 2FA. We highly recommend keeping this in a safe location such as a password manager like BitWarden.


Conclusion
Following these steps, we’ve successfully enabled 2FA on our account. Moving forward, after we log in with our username and password, we’ll be asked to input our 2FA code. This code is the 6-digit numerical code that changes every 30 seconds within your authenticator app.