Add the Service Provider to your Veeam Backup & Replication:
-
go to backup infrastructure and locate the service provider tab which you will see on the left hand side and either click “Add provider” in the ribbon bar or right-click out in the open area and add service provider now
-
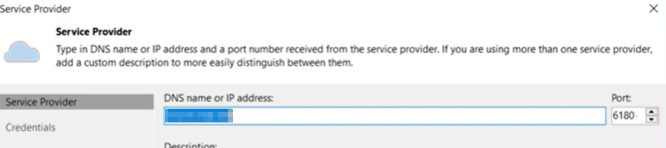
you’re going to be entering an IP or DNS name as well as a specified port number(these details will be given to you by the service provider). Then you will either need to check or uncheck the option “Allow this Veeam Bacup & Replication installation to be managed by the service provider”, then click “Next”

NOTE
depending on which level of service you’ve subscribed for you may or may not want to check the box to allow this particular deployment of backup and replication to be managed by the service provider. Now this might be considered backup as a service versus backup storage as a service, so If you want to permit the provider to remotely access and administer your Veeam deployment, manage your backup tasks, and retention policies, and adjust schedules, you can select this option. This grants them the required capabilities. However, if your intention is merely to use their data center as an additional repository while retaining full management rights on your end, it is likely unnecessary to enable this option. -
After you click next it’ll reach out to that target provider’s data center to verify the SSL certificate and then also ask you for a set of credentials(which will also be supplied for you by the service provider). To enter the credentials, click “Add”, then enter your username and password, click “Ok” and finally click “Apply”. This is when it reaches out and establishes the connection with the service providers data center
-
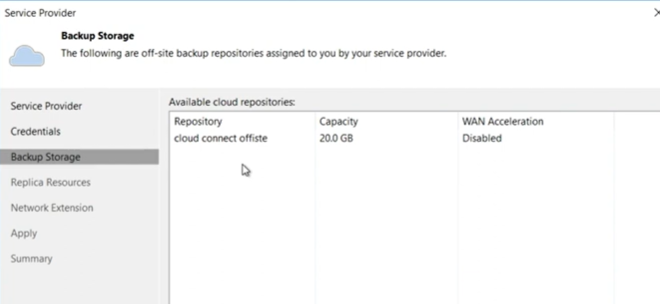
From here this is going to show you all the services that you have previously subscribed for, notice the first tab is backup storage this is if you simply want to use Cloud Connect backup and offload your backup data to a repository located within that provider’s data center as an extra layer of protection. it’s going to show you what the repository name is, the overall and total capacity as well as if you subscribed for wan acceleration.
NOTES
- The “Repository name” cannot be changed and is controlled by the Service provider.
- Replica Resources and Network Extension will not be available unless you have subscribed to those features


Create a Backup Copy Job
-
In the Veeam Backup & Replication console, select ‘Backup Copy’ under the ‘Jobs’ tab.
-
Click ‘Add Job’ to launch the wizard.
-
Name your job, add a description of the job, and modify the “Copy Every” option.
NOTE
The copy every is how often the backup copy job will look for new restore point data at the source. It’s a little bit different than your typical scheduling engine where you tell the job to run every day at 4:00 PM or every day at 3:00 AM, this is simply a sync interval so every day at 3:00 AM this particular job is looking at the source repository to see if there are any new restore points associated with the VMs that you’re offloading to the cloud. If there are new restore points the backup copy job will start offloading to the service providers data center, however, if there are not any new restore points this job will not run and it will wait until the next interval before it ever checks again -
Now you will choose what you want to send to the provider’s data center, in the example screenshot, there is just a single VM that’s 44.1 gigabytes in size. you have the ability to modify your exclusions, you can change the source for where you’re pulling this particular VM from and certainly, you can add more than one VM by manually picking from backups or you can link it to existing backup jobs, so every VM that happened to be included in that backup job will also get moved to the cloud now.
-
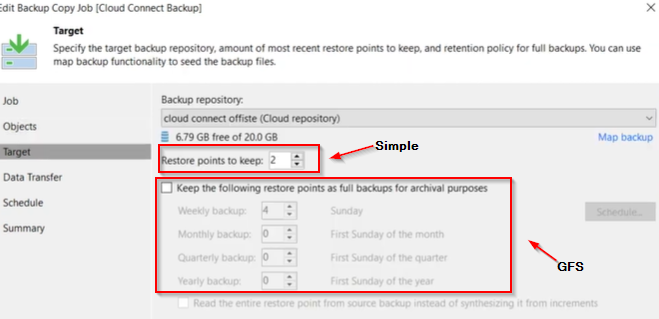
You will now need to choose the target that you want to backup to. You will want to make sure that you choose the option that matches the repository name from the previous section of this documentation.
Understanding retention options
There are two levels of retention call it simple and GFS.- Simple retention means how many incrementals that are going to maintain on the disc that is associated with the primary full that is moved the very first time so the very first time this job ever runs it will transfer a full backup to the cloud repository.
- GFS stands for “Grandfather Father’s Son” so if you need to have different periodic checkpoints such as weekly, monthly, yearly backups this is where you would set that retention policy.
NOTE:
One key point to remember once you get the full backup into the cloud it never sends another full backup to the cloud unless for some reason all your data was wiped clean. It’s important that if you do enable the GFS policy, the different checkpoints will be synthesized based on the data that already lives at that Veeam cloud and service provider data center. Get it seated one time to avoid that bulk data transfer over the wire and then regardless of what you do here with their retention it’s all managed and created synthetically on the backend simply transferring incremental data over the wire. -
Choose ‘Direct’ mode to send backups directly to the service provider.
-
Schedule when this copy job is allowed to run.
NOTE
This is not scheduling when the job will run, it is mainly just for scheduling when the job would be allowed to run.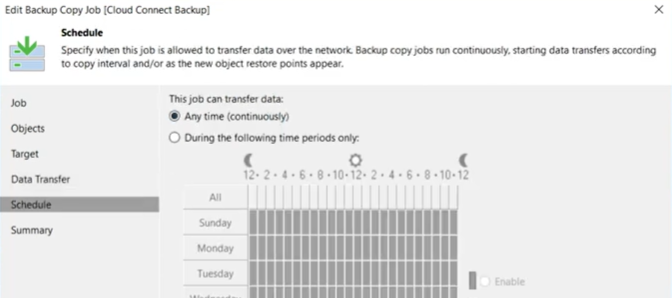
-
Click “Finish”


